 Delivery from 11 to 20 May
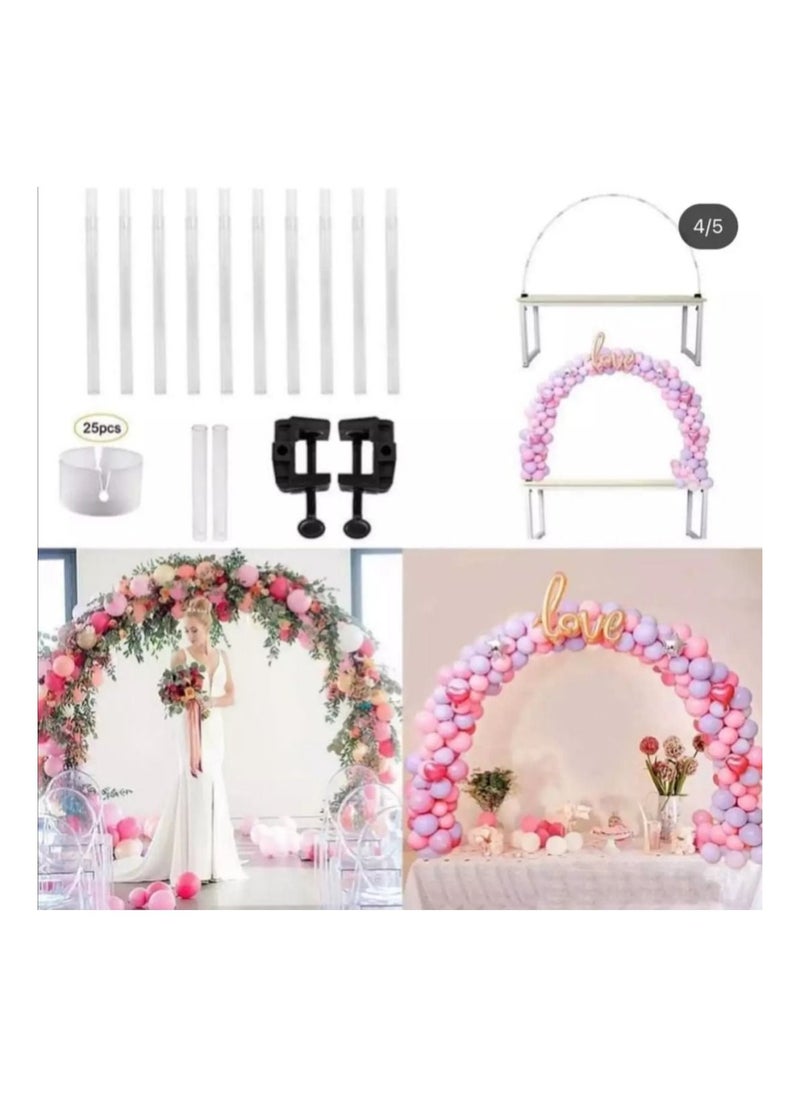
 Guarantee of authenticity and physical health of goods
 Free shipping
2,369
Women's Fashion
Men's Fashion
Girl's Fashion
Boy's Fashion
Sports, Fitness & Outdoors
Home & Kitchen
Health & Nutrition
Bags & Luggage
Beauty & Makeup
Fragrance
Electronics & Mobiles
Sports Nutrition
Health & Personal Care
Tools & Home Improvement
Toys & Games
Baby Products
Pet Supplies


Clothing
Dresses
Lingerie & Underwear
Arabian Clothing
Activewear
Loungewear & Nightwear
Swimwear & Beachwear
Hoodies & Sweatshirts
Skirts
Indian Wear
Uniforms
Shoes
Sandals
Flats
Boots
Handbags & Wallets
Wallets, Card Cases & Money Organizers
Watches & Accessories
Eyewear & Eyewear Accessories
Accessories
Scarves, Wraps & Masks


Clothing
Hoodies & Sweatshirts
Activewear
Pants & Trousers
Underwear & Socks
Jackets & Coats
Shirts
Loungewear & Nightwear
Arabian Clothing
Uniforms
Shoes
Sandals
Boots
Handbags, Shoulder Bags & Wallets
Wallets, Card Cases & Money Organizers
Watches & Accessories
Eyewear & Eyewear Accessories
Accessories


Clothing
Jackets & Coats
Indian Ethnic Wear
Shoes


Clothing
Jackets & Coats
Indian Ethnic Wear
Shoes
Accessories


Exercise & Fitness
Running & Training
Accessories
Fitness & Strength Training
Yoga
Massage Belts & Electric Stimulators
Trampolines & Accessories
Sports
Boating & Water Sports
Team Sports
Combat Sports
Racquet Sports
Winter Sports
Equestrian Sports


Kitchen & Dining
Glassware & Drinkware
Kitchen Utensils & Gadgets
Bakeware
Dinnerware & Serveware
Cookware
Flatware & Cutlery
Kitchen & Table Linens
Kitchen Knives & Cutlery Accessories
Food Service Equipment & Supplies
Water Coolers & Filters
Home Decor
Artwork
Home Decor Accents
Lighting
Slipcovers
Home Fragrance
Photo Frames & Accessories
Artificial Flora
Window Treatments
Candles & Holders
Kids Room Decor
Religious & Spiritual Items
Mirrors
Smoking Accessories
Photo Albums & Accessories
Kitchen & Home Appliances
Small Appliances
Large Appliances
Vacuums & Floor Care
Storage & Organisation
Kitchen Storage & Organisation
Clothing & Closet Storage
Laundry Storage & Organisation
Boxes, Baskets & Bins
Patio, Lawn & Garden
Gardening & Lawn Care
Outdoor Lighting
Gardening Equipments
Outdoor Decor
Watering & Irrigation
Pest Control
Outdoor Cooking
Patio Furniture & Accessories
Pools, Hot Tubs & Supplies
Generators & Portable Power
Farm & Ranch
Mowers & Outdoor Power Tools
Outdoor Heating & Cooling
Household Supplies
Household Cleaning
Dishwashing
Bedding
Duvet Covers & Sets
Decorative Pillows, Inserts & Covers
Bed Pillows & Positioners
Blankets & Throws
Sheets, Pillowcases & Sets
Comforters & Sets
Kids Bedding
Bedding Accessories
Mattress Protectors, Pads & Encasements
Bedspreads, Coverlets & Sets
Quilts & Quilt Sets
Inflatable Beds, Pillows & Accessories
Bath
Bathroom Accessories
Bathroom Storage & Organisation
Bath Hardware
Bath Linen
Bathroom Aids & Safety
Bathroom Lighting


Vitamins & Dietary Supplements
Digestive Supplements
Womens Health & Pregnancy Supplements
Medical Supplies & Equipment
Medical Face Masks & Shields
Braces, Splints & Supports
Health Monitors
Professional Medical Supplies
Daily Living Aids
Home Care
Occupational & Physical Therapy Aids
Home Test Kits
Diabetic Care
Health Care
First Aid
Women's Health
Sleep & Snoring Remedies
Adult Diapers & Incontinence
Allergy & Asthma Medicines
Alternative Medicine
Wellness
Massage & Relaxation
Sexual Wellness
Cough, Cold & Flu
Dental Supplies


Handbags
Laptop Bags & Cases
Travel Accessories
Diaper Bags
Shopping Bags & Trolleys


Face
Eyes
Nails
Lips
Makeup Brushes & Tools


Mobiles & Accessories
Mobile Phones
Accessories
Computers & Accessories
Computer Components
Monitors & Accessories
Tablet Accessories
Accessories & Peripherals
Laptop Accessories
Networking Products
Data Storage
Desktops
HDMI Adapters
Wearables
Smartwatches & Accessories
Fitness Trackers & Accessories
Video Games
Portable Audio & Video
Camera & Photo
Digital Cameras
Accessories
Surveillance Cameras
Binoculars & Scopes
Accessories & Supplies
Audio & Video Accessories
Television & Video
Home Theater Systems
Television Accessories
Home Audio
Software
eBook Readers & Accessories


Hair Care
Hair Accessories
Shampoos & Conditioners
Styling Tools
Hair & Scalp Treatments
Styling Products
Skin Care
Creams & Moisturizers
Treatment & Serums
Cleansers
Sun Care
Tools & Accessories
Eye Treatments
Personal Care
Bath & Body
Oral Hygiene
Feminine Care


Power & Hand Tools
Power Tools
Hand Tools
Tool Organizers
Electrical
Testers
Lighting & Ceiling Fans
Hardware
Safety & Security
Kitchen & Bath Fixtures
Bathroom Fixtures
Kitchen Fixtures
Painting Supplies & Wall Treatm
Masks & Respirators
Measuring & Layout Tools
Laundry Care
Hangers & Clips
Rough Plumbing
Building Supplies


Party Supplies
Dressing Up & Costumes
Novelty Toys
Games
Figures & Statues
Sports & Outdoor Play
Pools & Water Fun
Arts & Crafts
Baby & Toddler Toys
Stuffed Animals & Plush
Learning & Education
Remote Controlled Toys
Hobbies
All Dolls & Accessories
All Pretend Play
Building Toys
Ride-Ons, Tricycles & Scooters
Electronics For Kids
Die-Cast & Play Vehicles


Nursery
Baby Bedding
Nursery Decor
Baby Furniture
Nursing & Feeding
Weaning & Toddler Feed
Bottle-Feeding
Breastfeeding
Pacifiers & Accessories
Bibs & Burp Cloths
Food Mills & Storage
Highchairs & Booster Seats
Bathing & Baby Care
Grooming & Healthcare
Hair, Body & Skin care
Washcloths & Towels
Diapering
Diaper Bags
Diapers
Changing Mats & Covers
Wipes & Holders
Diaper Bins & Refills
Diaper Stackers & Organisers
Safety Equipment
Clothing, Shoes & Accessories
Baby Gear & Accessories
Baby Transport
Infant Activity
Potty Training
Baby Health Care Products